Tuesday, June 11, 2013

Air Conditioning Tips

Passed a milestone today,  which normally I would simply show and give the latest figures as to the costs per day and per mile.

But when I tested the a/c for the first time this year, it had nothing, which is rare cause I've had to add a small of freon  the past few years to get the super chill back, but even then I had something. 
So I went under the hood and removed the low end cap to hear it leaking from the valve. My refill kit had rusted thru so I hit up the walmart and get a gauge and freon (with lubricant, and NOT SYNTHETIC). Put him on the meter and he's pretty low for some reason, i'm slightly concerned about the leaking but my bicycle valve stem tool is not big enough to see if someone loosened up the thing and maybe that's why he's leaking. I put enough in to get half way thru the green zone, the added pressure stops the leaking valve, and do a road test. It works okay but when I stop the car, the cooling also stops. So knowing that a chain is only as strong as it's weakest link, I turn my attention to a/c radiator which has never been cleaned in 10 years.
I find the part behind the bumper is clean as a whistle but the bottom working half is slightly dirty. I check around the web to find a guy who simply uses purple power to remove the bugs and grime which accumulates in the radiator.
I have an old spray bottle hanging around cause I don't throw everything away just for this reason. Right off the bat I see the brown foam coming out the front of the radiator so I keep at it liberally concentrating on the dirtier bottom half. Then I hit it hard with the hose until I see clean water dropping down. I retest that sucker and I want to tell you something, I can't recall it ever being that cold, and the freon and gauge was about $33 and the gal of purple was under $5, so i'm once again considering myself lucky to have skirted the auto shop again, at a rather low cost for the comfort of driving down south in summer. Other than that the car been haulin the mail big time, when ever and for what ever  reason I need it to do.


Friday, April 5, 2013

Power Steering and Alternator Belts Changing

Once a year I check the condition of the small belts and considering their age an dryness it was time for them to go. It's a fairly simple and quick job which took about an hour and cost $23. You are best using on sockets a 12, 13 and a 14 mm will complete the task. First I take off the left tire and remove the 2 plastic plugs to get to the bottom of the belts. Don't take off the whole skirt, just bend it down when you need to see or get to the bottom of the belt.

I found it easier to just remove the power steering pump and reservoir to get to the alt belt and so you need to remove the bolts to the pump.

You can't see it well, but w/ a trouble light there is the same type of tensioner on the alt as there was on the p.s pump. Just loosen it until the belt is removed. Reverse the order to replace the new belts and then check to see if you get any power steering back from additional grip of the new belts. That's the only thing i noticed was a 20% increase in the ease of my wheel, besides the peace of mind knowing they won't break on the road.

Friday, January 11, 2013

Ten Year Anniversary

     Besides the car still haulin more than the mail. There is not much that needs saying execpt perhaps the statistics. The car averaged 10,833.65 miles per year, over 10 years, and besides the filters and lubrication costs (which were minimal), the battery and that froze inside in 2010, and the front shoes, are the only items that have needed replacing. So the cost per mile goes down to $1.67 per mile, and the cost per day goes down to $4.96 per day.

Sunday, September 23, 2012

Removing The Door Panel


This job is one of convenience, I personally hate to have the door shutting me in as I attempt to get out of the car. So I did some diggin and found the part (which even I forgot the name of ) was not available at the auto parts store and before paying the dealer [I didn't even check the price, I am certain it costs plenty though] I called my local junk yard, whom I havn't seen in quite a while cause the car was too new and they had no parts. But this time he said he had 4 or 5 of those 01-05 civics and so I traveled the 20 miles and brought my tools.   The goal was to locate a rear door that had not been used much, you can tell by the white streaks of grease and the resistance of opening the door. Before that though, I hit you tube up for an explanation of how to remove the door panel and so here we start. Well I got lucky and there was a rear panel removed with an unused hinge, it took 2 minutes and $10 to get my part.I would get the part first from where ever, you will need some glue to put back a cover and this is automatic, dealer approved, and covered up for obvious reasons. The main reason I know this is because my door lock first went bad at 30,000 miles and so I brought it in for a one day warranty job, got the ride back home from the dealer, and when I called to pick it up, they said it would be another day. Well now I can see why it took another day, because he had to order that part on a one day shipper fee and then all was good. So here are pics of the covers to be removed and I had to use my dental tool on the top one and a tack puller I never use, never lost, but have had for many decades. Always start prying from the bottom and in this case I was quite successful.                               
                                                                                                                                                                                 
    This formating the photos has also gone down hill on this site, it won't be long before the site is gone all together one day but for now just be patient. The trick here is to start with the inside door handle cover first, then do the arm rest one, remove the 2 small screws from the upper and deep inside the arm rest are the 2 larger screws. Now the tack puller was the perfect job for this twister of a job, [you want to break as few of the plastic parts here as one can], so the lever is attached with a plastic gizmo that simply needs to be leveraged off, by pushing the plastic 3/4 round housing away from the rod it is attached to. Here is a photo but I dont know how well you can see this operation from it. At this point do not try to remove the mirror cover for the door panel itself has to lifted away from the cover to try to remove it.


Now use the tack puller on the bottom of the door panel itself to pry off the door panel going up the sides after the bottom.


Now what I did was to lift the door panel off the lock button and raise it so you can try to remove the mirror cover, he will act as if he wants to come off easy but there is a one way metal clasp holding the majority of the cover on, so when you pull it straight out or towards you, it will have to break the plastic seam holding it together, I simply glued it back on, and not to much in case I have to back in there for some reason, there are a # of things going on inside the door panel for it too be removed in the future. Unhook any electrical connections whenyou see them, they will have a tab in the center and then they can be easly pulled off. Carefully remover the plastic so you can stick it back in place, and unscrew the bolts with sockets, remove the regulator hinge, and go in reverse to put it back together, and don't forget to fish out the wire harnesses before snapping back on the door panel or like me you will have to do that twice.


I didn't have trouble aside from the mirror cover, and it took only 10 minutes or so to complete,having the right tools will go along way with this job. Good luck with your panel(s).


Wednesday, August 29, 2012

A Tricky Call

Back in the day we encountered all types of problems that took all kinds of trial and error to discover the core of the problem. Sometimes it was more than one at a time which made for a challenging time trying to figure out which one was to be of the most concern. I was helping a friend move some things with my trailer when I smelled some anti freeze. Now I don't use much in the summer and for the most part had a 95% water blend but once I got home and popped the hood I noticed the radiator over flo tank had filled up and was seeping some gasses and that was the smell I caught. Well I looked closely and it seemed to me to be a one way valve that lets water out the tank when you need it and somehow had failed and introduced water into the tank. So I had to go to the dealer to get the part (and consequently the hose to) and set to replacing it. Here is a pic of the tank cap mostly, but looking down from above the tank is sandwiched beside the radiator and under the battery.


 Now make sure you have your radio code ready because you have to remove the battery to remove the tank in order to drain the tank and replace the one way valve. So I do all that just to figure out the one way valve is no valve at all (no tips from the dealer on this one either as I explain the situation to him) but a simple plastic cylindar meant to prevent the hose from wearing on the clip it is attached to on the tank. Come to find out that the hose simply is attached at the bottom of the tank and runs to the radiator cap where it takes or gives water according to the pressures inside the cooling system which are generally cause by the heating and cooling of the engine. So I took off the radiator cap to find one of the rubber seal had wore out and split in two and so this became the # 1 culprit because all along the temp gauges never budged a degree and that is where the extra pressure always came from in the past.  


I went the auto parts store and bought another cap, the original probably wore out quicker than it might have if I had not changed to a anti freeze in the winter and water in the summer scenario which requires one to remove and replace the cap as many times as it takes to get 95% of the anti freeze out of the car in the spring which is at least 4 or 5 times per year, and I have been doing it that way for a year before I published it here. So now I am a happy camper because I just drained my tank and got 9 and half years out of a cap that only cost about $7 to replace and that's my kind of dealeo, plus I had my code so now the radio works without having to pay $40 to get the code back. (I later found the card code in my wallet, but in a pinch some years back I had to pay).
 

 So now i'm on the tank again like a hawk, I don't where the water goes to need to be replaced in the tank if there are no visible signs of water leaving the engine compartment, but 2 to 3 years after I bought the car the tank would need checking and filling, and I heard all sorts of horror stories if you let the tank run dry. You never smell the anti freeze on the way out, but the tank is low for some reason, so it was what it was.
 

 Well, low and behold I check the tank a couple days later to find the damn thing filled up again, and now I think I'm about to start steamin just to figure out what in heck is going on here. I know the water pump is working because the water temp is fine, and its not leaking anything, and that's my first signal that the pump is the problem so next I turn my attention to thermostat. I start by purchasing one, and the gasket used with it also.   This job is not listed in the manual, for good and profitable reasons, but next time I would replace this every 5 years no matter the condition.  [In the past when we had radiator or over heating problems, it was simply easier to pull the thermostat completely and the problem was always resolved, before that we just turned on the heater in the summer, which was okay until you moved down south, and then your body would take the toll. It worked until winter, when then you didn't know why you had no heat on your feet and that lead back to thermostat and the trial and error of an over heating motor.]
The housing is located below the upper hose, first remove the plastic wiring harnnes and the bracket too, this will save your knuckles from getting torn up in this procedure, once removed with a10mm socket , keeping the lower hose attached, you will have pry out the thermostat with a screwdriver and some water will flow out. The direction of the flow of  water through the system is from the lower hose, and into the thermostat. Which opens from the heat of the engine block.

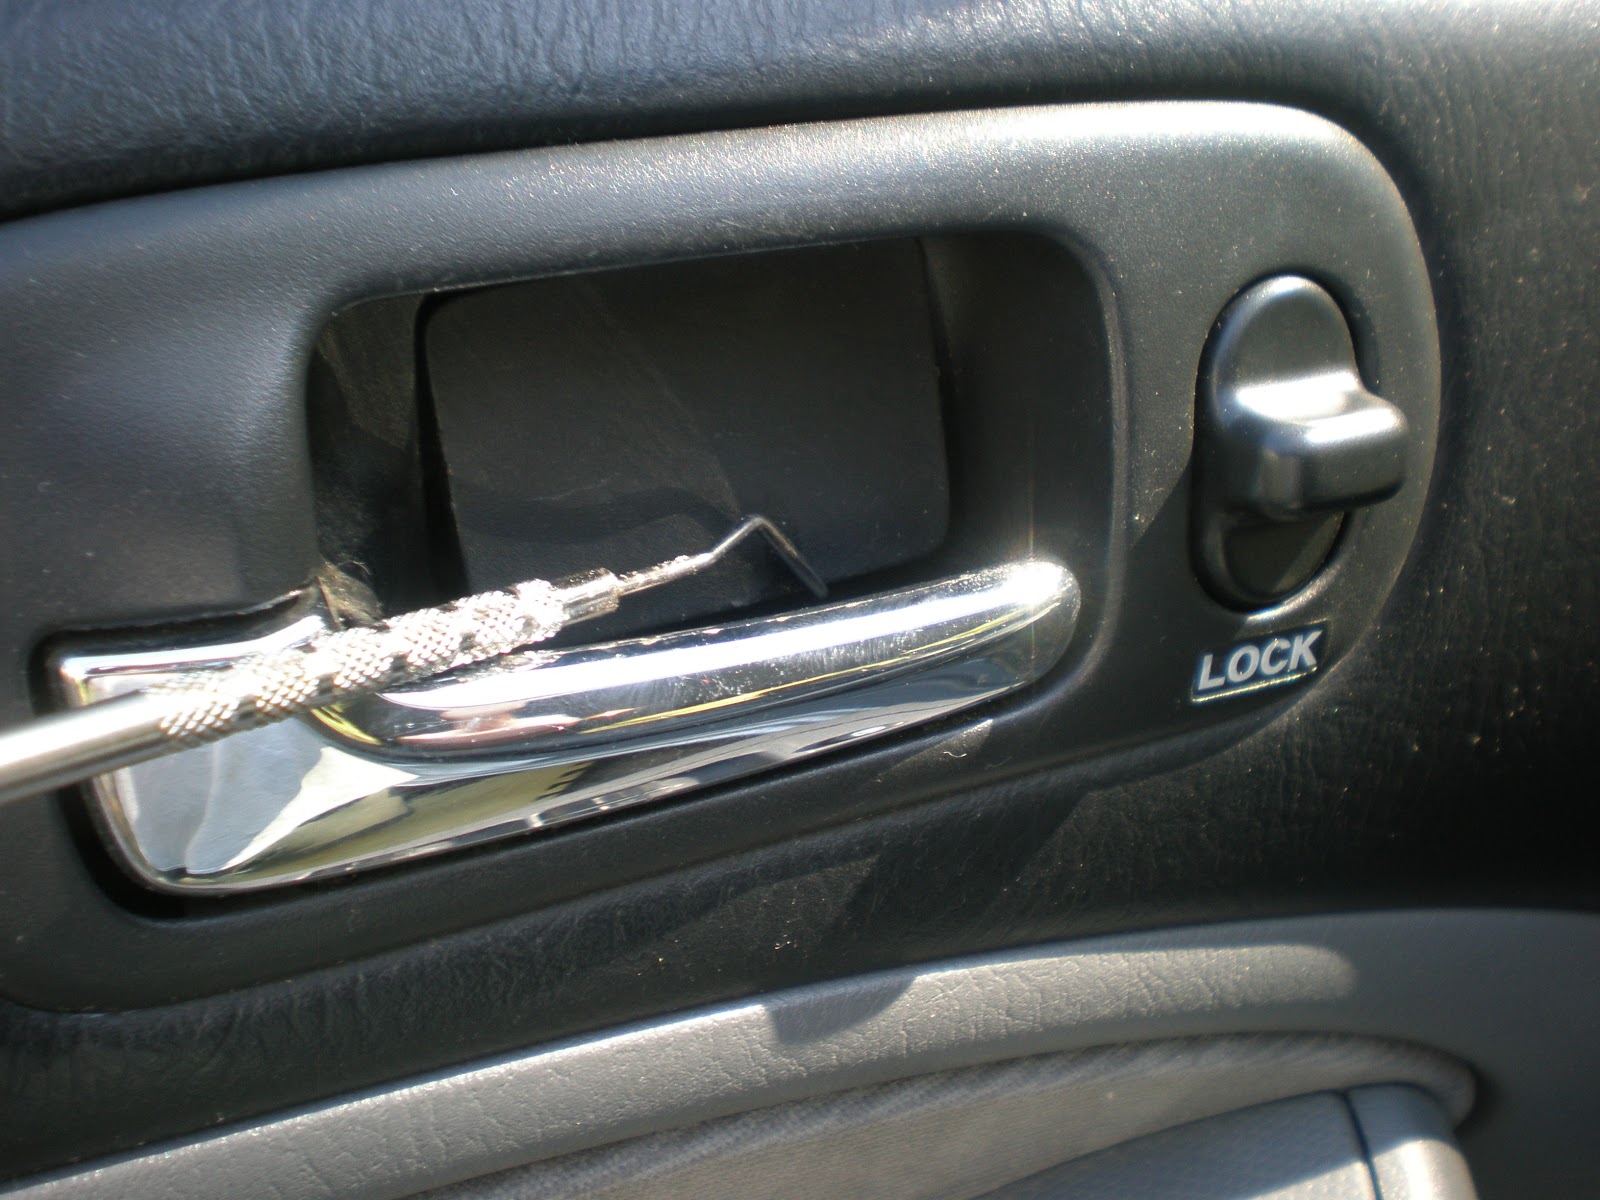
 It was tough to see at first, but a wonderfully designed part is what created the over flow problem to begin with, and if you were to have to have brought this problem to the dealer, you could be looking at a hugh bill if the dealer decided you needed a water pump, and or a timing belt, or a whole host of scenarios depending on which path he decided to take you at that moment [there is no doubt in my mind at this point] Because upon close inspection of the thermostat you will see a strong rubber gasket which has moved into the flow pattern of the water pump and caused a blockage of the flow through the thermostat. This is what caused the tank to over flow, and even more than that, the efficiency of the cooling system is compromised because of this. Now these cars and my methods were enough to prevent an over heating of the motor, even though the water stopped circulating, but the real improvement was in the transmission, the transmission cooler is located at the bottom right hand corner of the radiator, which had no flow because of the design of the thermostat and the position of the cooler. I noticed this as I cruised controled at high speeds, the transmission did not down shift as it usually did because now it was operating more efficiently. I removed the part of the rubber which can be seen at the tip of the ice pick in the photo. The new thermostat did not have this extended rubber part, which is how I figured all this out.

Its a tricky little design meant to get you to put trust in the dealer, and for him to profit handsomely from it, just not in this case.


Thursday, February 2, 2012

100,000 Mile Engine Wash


        Its been 4 years to the day since I started this blog and I have enough material for a masters in addition to half the material for a doctorate degree. I could have started the blog with this phrase but instead showed the problems first before the cures.
       The trick to proper lubrication is using the right componants in the correct amounts at the right time, or the thin films of oils are evaproated along with the protection of metals they provide. Even accomplishing this requires a more complete cleaning than simply changing your oil. Two things to take note of here, one is when you hear a clicking exhaust valve, it is the burnt carbon build up that has stopped the lifter from completely closing affecting performance. Mine came around 100,000 mi but yours can vary. The solution is to get a pint of engine cleaner [I used Sea Foam] and put a half can before the oil change, (we used to use kerosene in the old days but soon relized that kero does not have too many lubricating property's and this would breakdown the lubrication process). I drive the car about 10 miles and let it soak in for the nite, drive another 10 or so and park it again for the nite. Then I use the other half pint and drive around the block 5 mi or so and dump the oil and filter, I like to use a wrench off filter with a one inch socket and a breaker bar and I let the oil drain all nite. I noticed a thick hot/warm oil coming from the filter and this was one  way to know that a good portion of the dried exhaust carbon had been removed and was now ready for the new lubrication. The second thing to take note of, is the smell of the engines inside from the valve cover, it will smell and could look like burnt carbon, but after the wash and new lubrication oil has circulated some, the smell should be reduced or gone altogether, mine smelled as fresh as an engine with 96,000 mi could ask for and this was only done once during that time, it can be done more often but keeping the films of oil between the rings and cylinders is of upmost importance and this is the only time you fall victim to that occuring. Next I will study the tranny and power steering and see about removing those possible buildups, although it may be just as easy to do it when I remove and add those fluids for I don't have the equipment to remove all the fluid at once, as we do with the engine and so a different approach will be needed. The car starts slightly better but it already started lightning fast so the improvement was minimal considering there was not to much further to go from where I was.

Friday, January 6, 2012

Cleaning Drum Brakes

The blogger no longer uploads video so I had to create a way to link w/ it and you tube was the way.
Notice I have a catch basin for the dirty liquid, and I covered all parts except for the shoe padding itself. The spray goes on sale twice a year at napa and was $2. I didn't spray the rejuvenator on the rubber boots, instead I used a can to place the oily substance and rubbed my finger around to cover the whole surface.  
http://www.youtube.com/watch?v=TRfSwlCf3ZQ